Creating a Bootable Windows 10 UEFI USB Drive Using Linux
Update December 6, 2022
I’ve verified that the instructions below will ALSO work with Windows 11 22H2.
Creating a Windows 10 boot USB for UEFI used to be pretty easy. Things have changed with the October 2018 Windows 10 1809 update. Luckily it’s still pretty easy, but it’s a bit more involved than creating a Ubuntu UEFI boot USB.
Table of Contents
Before you begin there are a few things you’re going to need:
- USB drive you don’t mind erasing (8GB in size or greater)
- Windows 10 or 11 ISO file depending on which one you’re installing
- 7-zip installed
The Problem
It was possible to create a bootable UEFI USB for Windows 10 versions prior to the October 2018 Windows 10 1809 update fairly easily by following my previous tutorial creating a Ubuntu UEFI boot USB. That tutorial was for Ubuntu Linux but the process at the time was exactly the same for the Windows OS, you just needed to copy the files from a Windows ISO to the USB instead of the Ubuntu ISO.
The problem now is that the Install.wim file provided in the Windows 10 1809 ISO download from Microsoft is over 4 GB in size. We need to have our boot USB formatted as FAT32 in order to boot properly on all UEFI computers*, and FAT32 has a file size limit of 4GB. The install.wim file is now too large to copy to the FAT32 partition of the USB.
*Note it is possible to create a USB formatted as NTFS and have it boot, however this does not work on all computers. The only “universal” file system to use to ensure the USB will boot is FAT32.
To work around this, we can use a solution as described in this post from Win10.guru, which creates a USB with a bootable FAT32 partition for the Windows 10 boot files, and an NTFS partition for the install.wim file. The beautiful thing about this solution is that not only can you use it on the official Windows 10 1809 ISO file, but you can also use it if you make your own custom Windows 10 image with an install.wim file greater than 4GB in size.
Formatting the USB Drive
-
Open a terminal window
-
Install gparted if not already installed
$ sudo apt install gparted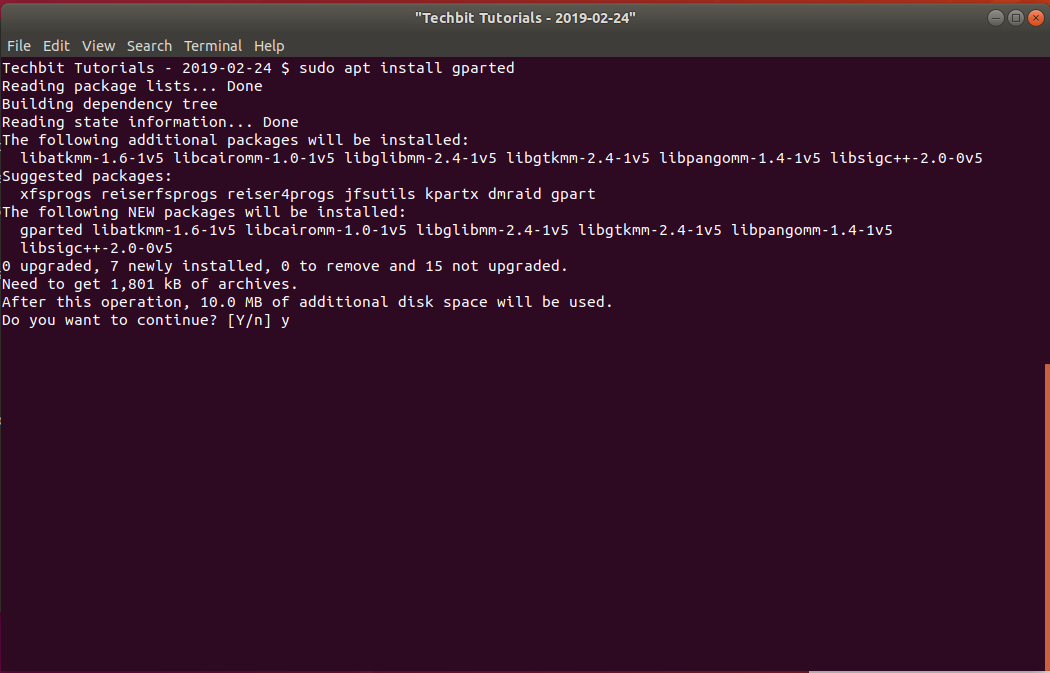
-
Run gparted. Gparted will need admin rights so make sure you run with “sudo”
$ sudo gparted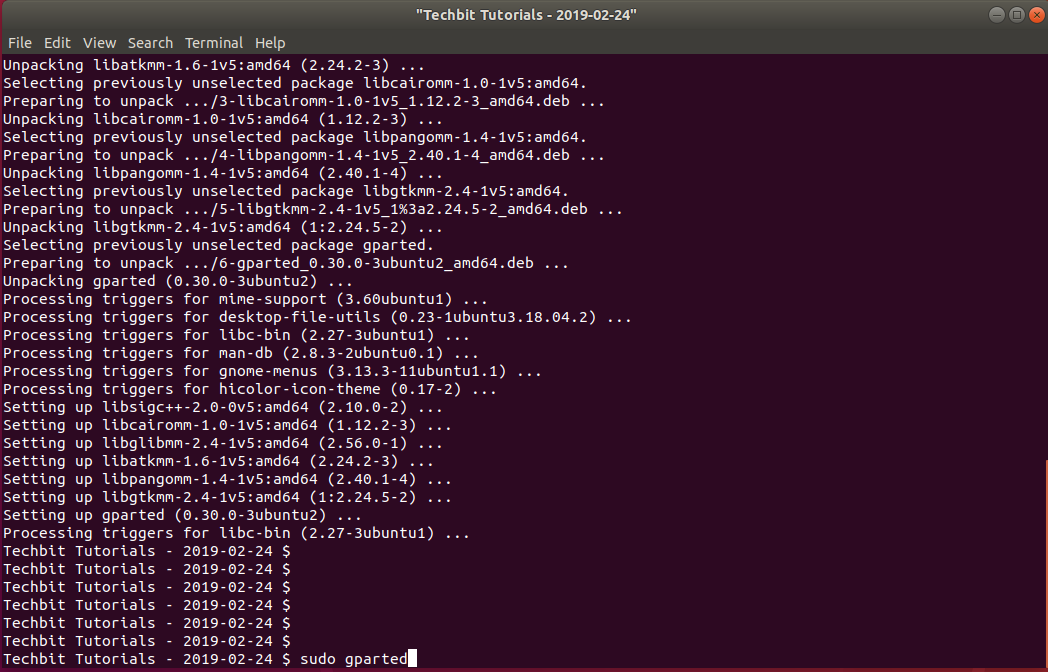
-
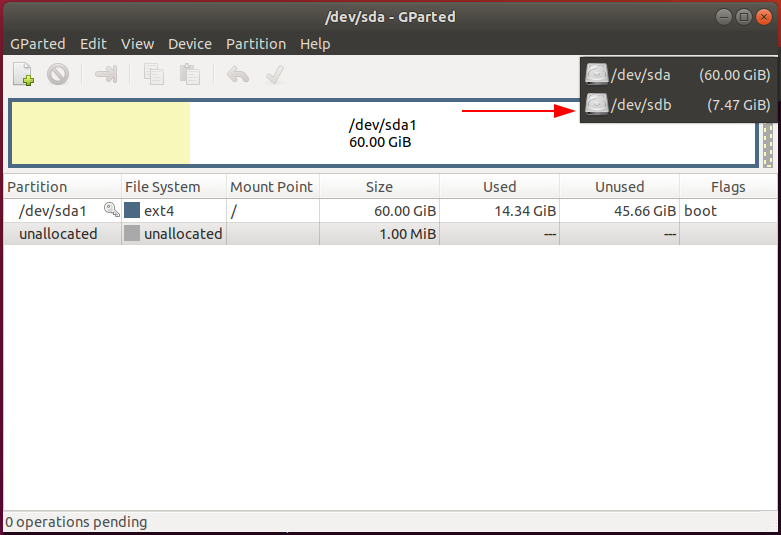
Choose your USB drive from the dropdown in the upper right-hand corner
-
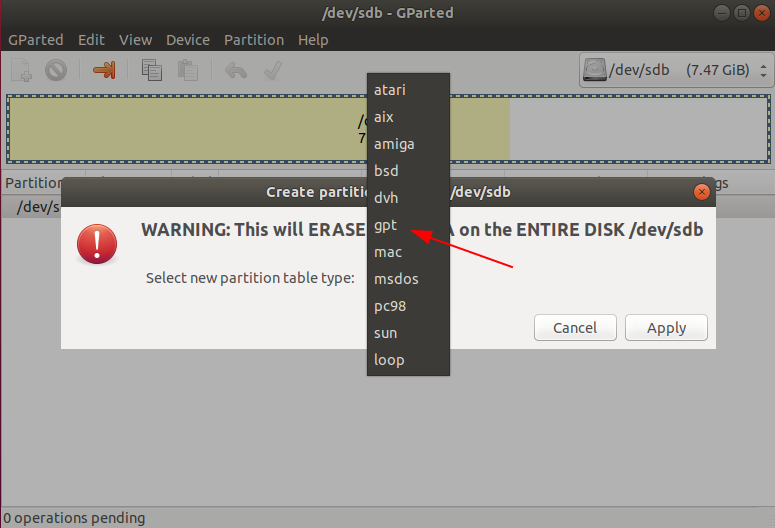
Make sure you have the correct device specified, then go to the “Device” menu and choose “Create Partition Table…”

-
Choose “gpt” from the partition table type dropdown
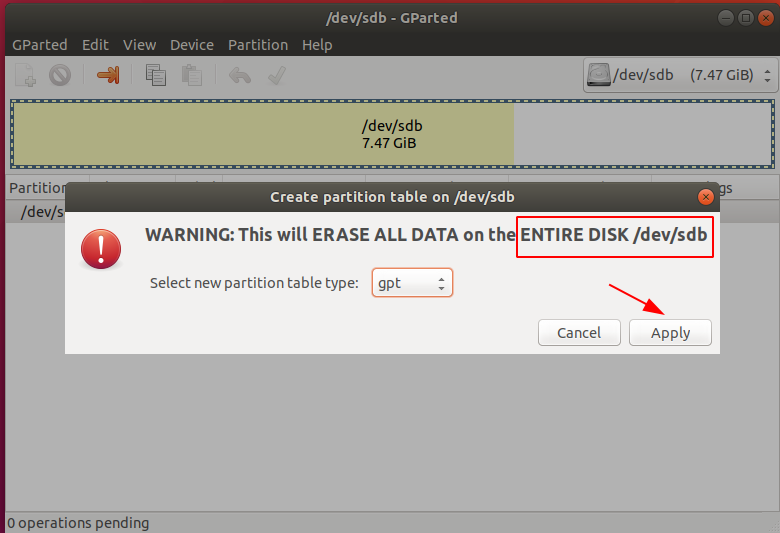
WARNING
Clicking “Apply” on the following screen WILL delete ALL data on the selected partition. Ensure the correct drive/partition is chosen as choosing the wrong drive WILL DELETE ALL DATA on that drive. You have been warned.
-
Again ensure that you have the correct device specified and then click Apply
-
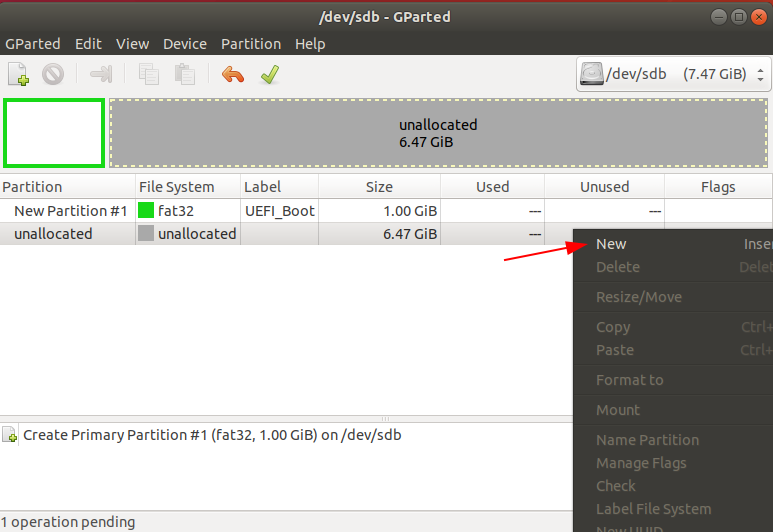
Right-click the new unallocated space and choose New
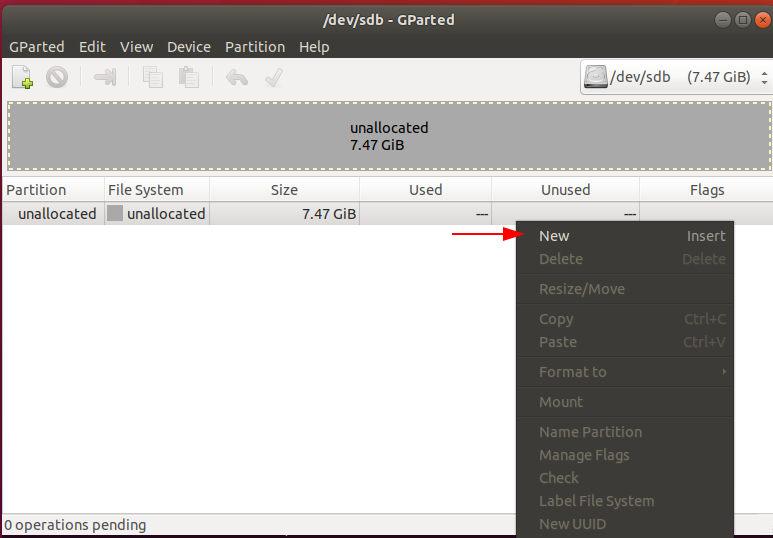
-
This will be our FAT32 partition that we’ll boot from
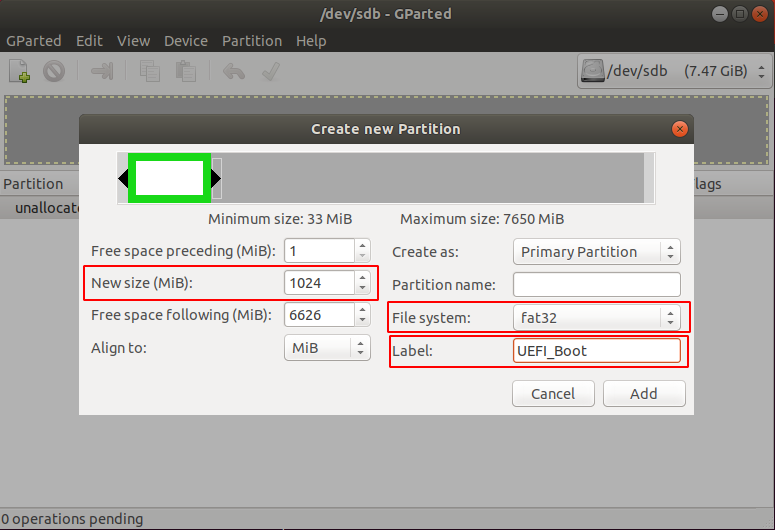
- 1GB in size will be plenty, so enter 1024 in the “New size (MiB)” field
- From the “File system” dropdown choose fat32
- Give it a descriptive label. I chose “UEFI_Boot”
- Click Add when done
-
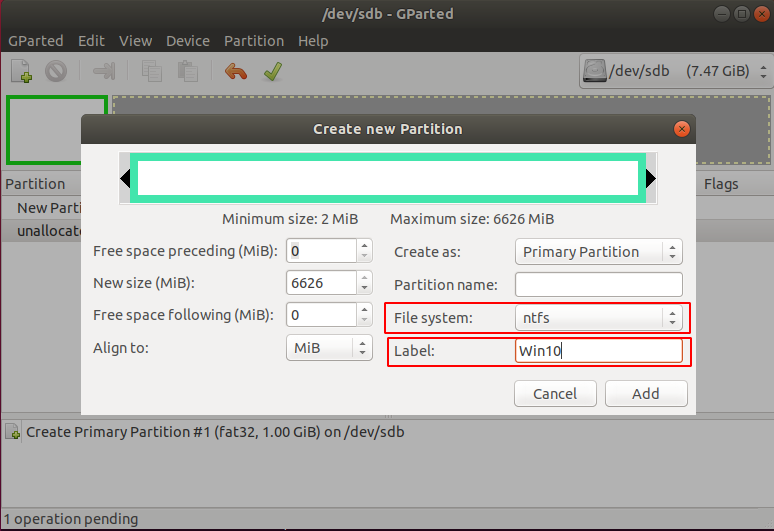
Right-click the unallocated space again and choose New
-
This time we’ll create a NTFS partition for the install.wim file (and other necessary files)
- We’ll let it use the rest of the free space available on the drive, so you can leave the “New size (MiB)” field alone
- From the “File system” dropdown choose NTFS
- Give it a descriptive label. I chose “Win10”
- Click Add when done
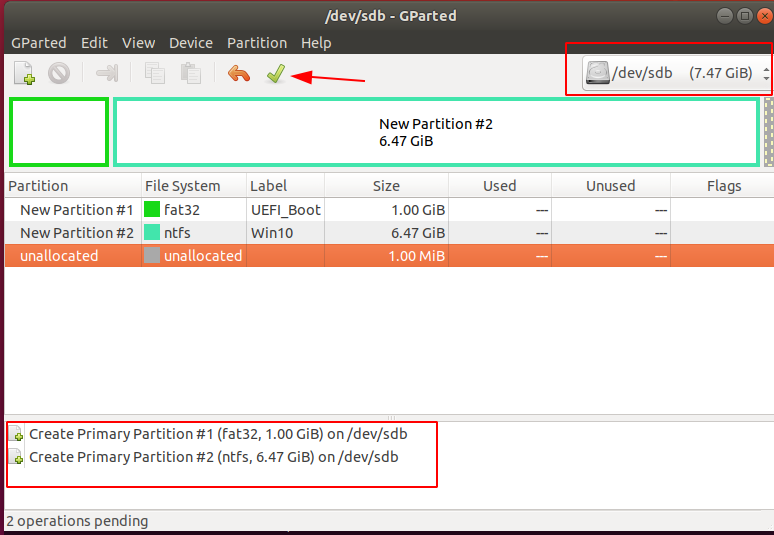
Note: You’ll likely have a small amount of unallocated space left over. In the case below it is 1MB in size. This is normal and perfectly fine.
-
Ensure that the partitions look correct, and again, most importantly ensure that you’re using the correct device. If everything looks good click the green checkmark to apply the changes
WARNING
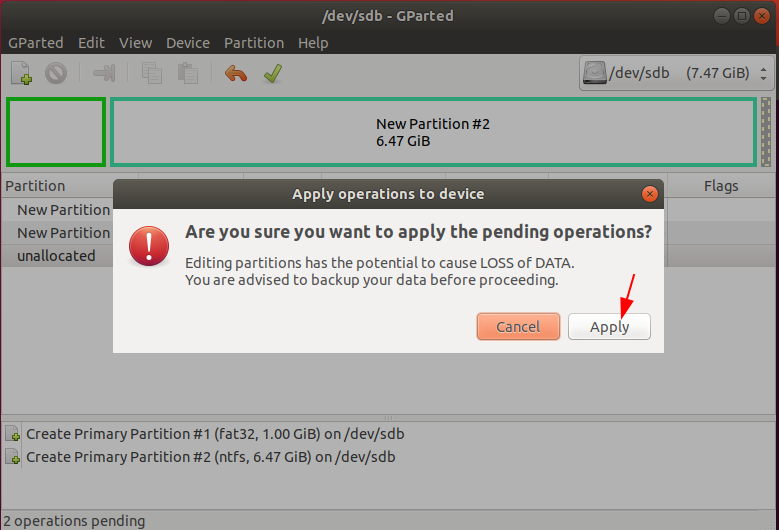
Clicking “Apply” on the following screen WILL delete ALL data on the selected partition. Ensure the correct drive/partition is chosen as choosing the wrong drive WILL DELETE ALL DATA on that drive. You have been warned.
-
Click Apply again on the warning confirmation in order to make the changes
-
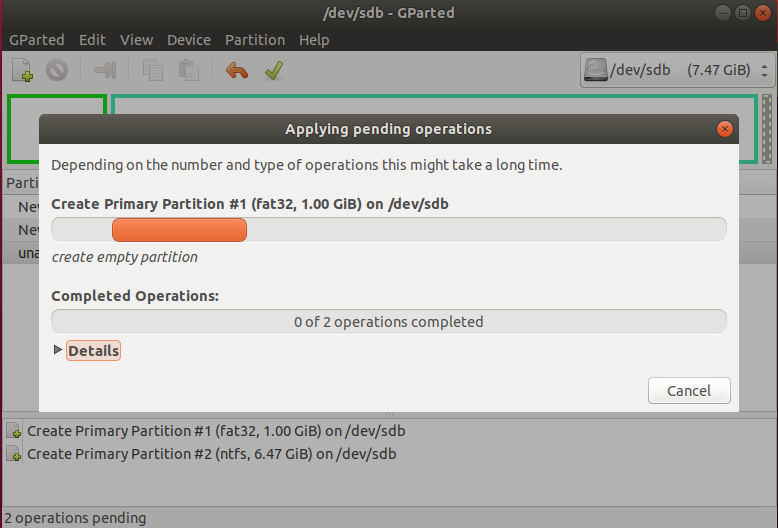
A status screen will appear as gparted makes the necessary changes to the partition layout
-
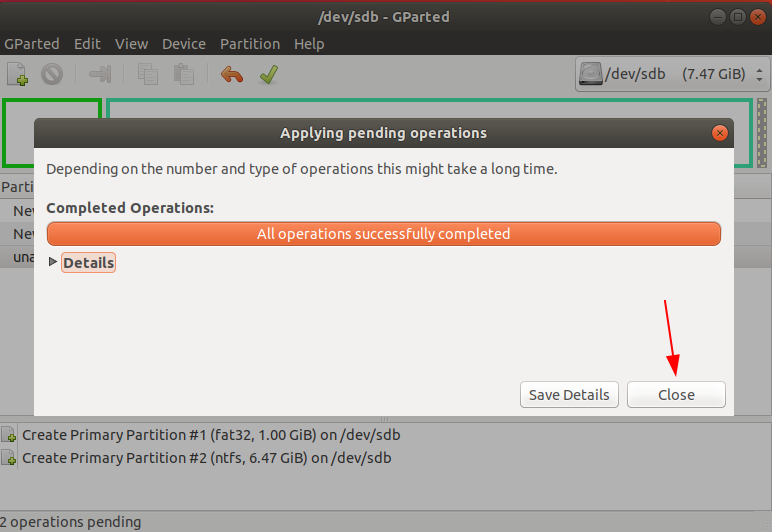
When the changes have been completed, you can click Close on the dialog window and then close gparted
-
Next open a file explorer
-
You should see that you now have the two new partitions that you just created
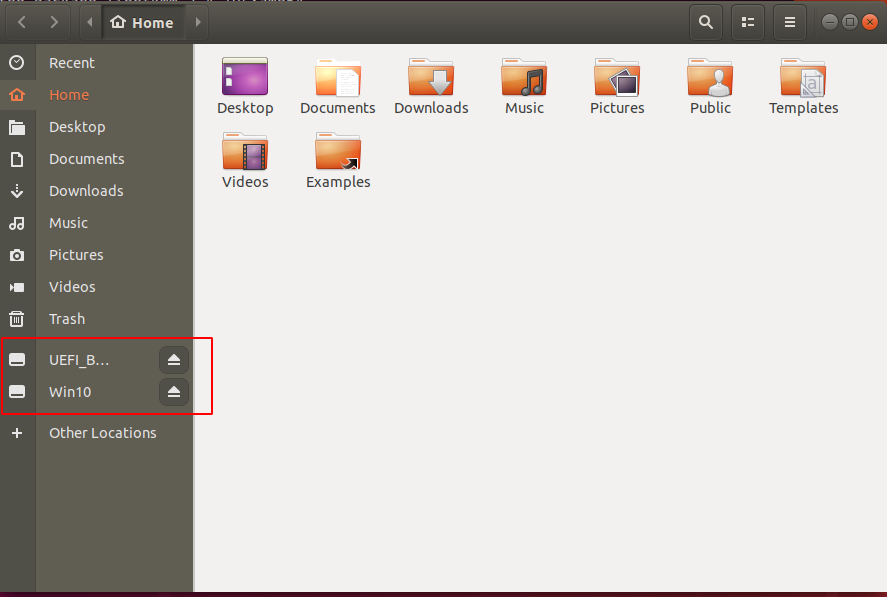
If you don’t see the partitions unplug the USB drive, wait 5 seconds and plug it back in. The partitions should appear automatically in the device list on the side as above.
Creating the UEFI Bootable USB
Now that we have a freshly formatted USB drive, we can proceed to creating the UEFI bootable USB. In short, we’re going to:
- Extract everything but the “sources” folder to the FAT32 partition
- Extract the “sources/boot.wim” file to the FAT32 partition (needed in order to boot)
- Extract the entire “sources” folder to the NTFS partition
-
Open a terminal window
-
[Updated 2021-07-29] We’re going to need to know where our USB drives are mounted so that we can copy the files to them. Note this assumes you named the partitions the same as me. If you named them something different replace with your names in the command below.
So in our case the partitions are mounted to /media/blah/UEFI_Boot and /media/blah/Win10 respectively. You will need to replace these mountpoints in the below commands with the mountpoints corresponding to your system.$ lsblk | grep UEFI_Boot sdb1 8:32 1 1.0G 0 disk /media/blah/UEFI_Boot $ lsblk | grep Win10 sdb2 8:32 1 6.47G 0 disk /media/blah/Win10 -
Before we copy the files to our USB stick using 7-zip (‘7z x’ command), let’s find the files we need to extract
-
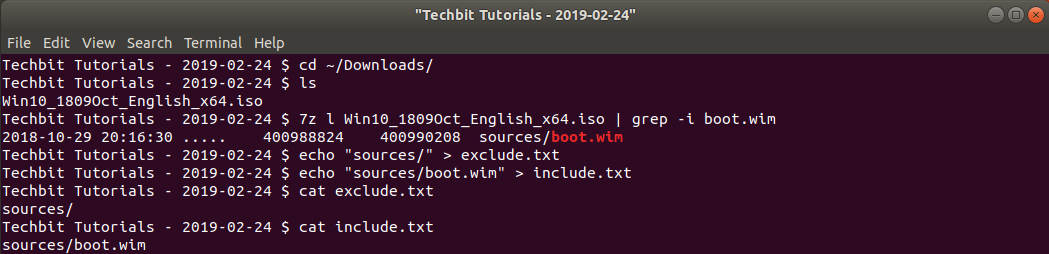
Change to the downloads folder where our Windows 10 ISO file is located
$ cd ~/Downloads -
View the files in the folder
$ ls Win10_1809Oct_English_x64.iso -
List the contents of the ISO file and search for boot.wim
$ 7z l Win10_1809Oct_English_x64.iso | grep -i boot.wim 2018-10-29 20:16:30 ..... 400988824 400990208 sources/boot.wim -
Add the “sources” folder to a text file containing a list of files to exclude
$ echo "sources/" > exclude.txt -
Add the boot.wim file to a text file containing a list of files to include
$ echo "sources/boot.wim" > include.txt -
Show the contents of the exclude.txt file
$ cat exclude.txt sources/ -
Show the contents of the include.txt file
$ cat include.txt
sources/boot.wim
-
-
Now we can build our 7-zip extract command
Note: We’re creating two files above “exclude.txt” and “include.txt” because 7-zip is capable of excluding or including specific files to extract, but it will only take the input in the form of a file listing or a wildcard pattern
# Extract the contents of the ISO file to the FAT32 partition using 7-zip,
# but exclude the "sources" file.
# Exclude using 7-zips exclude function: -x@filename.txt
# -o/media/blah/UEFI_Boot/ is the mountpoint for the FAT32 partition on this
# system. You will need to replace with the mountpoint for your own system.
$ 7z x -x@exclude.txt Win10_1809Oct_English_x64.iso -o/media/blah/UEFI_Boot/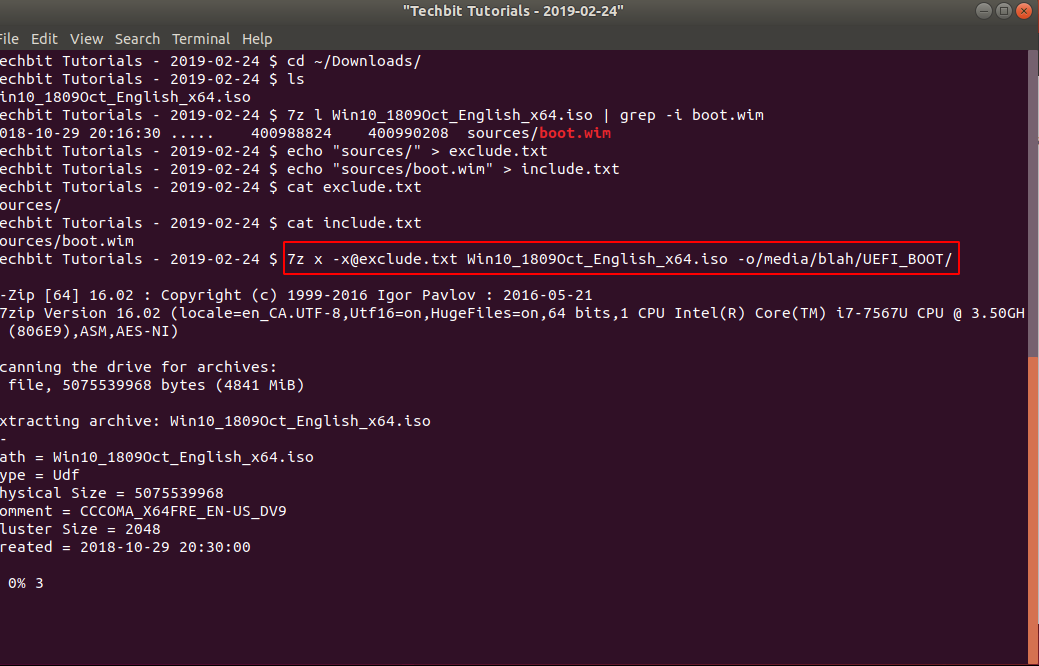
-
When that extraction finishes, we’re going to issue the same command again, but this time we want to extract only the boot.wim file to the UEFI_Boot partition.
# List the contents of the UEFI_Boot partition
# Notice that the "sources" folder does not exist
$ ls /media/blah/UEFI_Boot/
autorun.inf  boot  bootmgr  bootmgr.efi  efi  setup.exe  support

# Extract only the files specified by the include file to UEFI_Boot
# Include using 7-zips include function: -i@filename.txt
# -o/media/blah/UEFI_Boot/ is the mountpoint for the FAT32 partition on this
# system. You will need to replace with the mountpoint for your own system.
$ 7z x -i@include.txt Win10_1809Oct_English_x64.iso -o/media/blah/UEFI_Boot/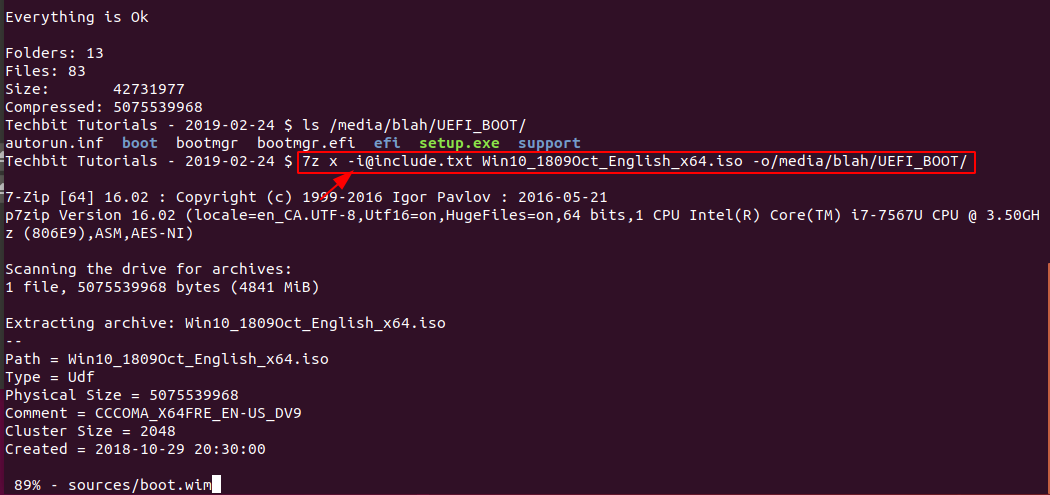
-
After the boot.wim file is extracted we can see that it exists on the UEFI_Boot partition with the ls command
$ ls /media/blah/UEFI_Boot/sources/
boot.wim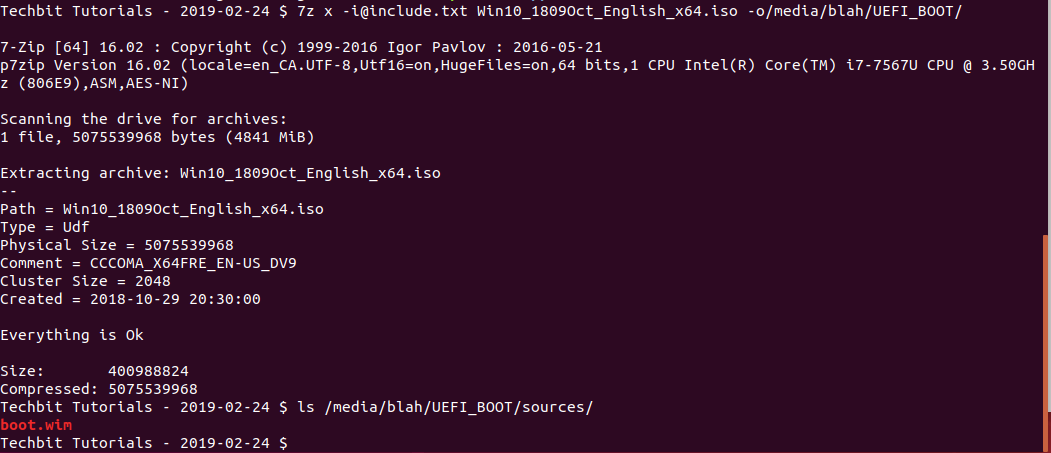
-
That’s it for the FAT32 partition! Now we can extract the entire “sources” folder to the NTFS partition.
# Extract the "sources" folder to the Win10 partition. Since we already
# have a file containing this information (exclude.txt), we can use
# the include function with the existing "exclude.txt" file
# Include using 7-zips include function: -i@filename.txt
# -o/media/blah/Win10/ is the mountpoint for the NTFS partition on this
# system. You will need to replace with the mountpoint for your own system.

$ cat exclude.txt
sources/
$ 7z x -i@exclude.txt Win10_1809Oct_English_x64.iso -o/media/blah/Win10/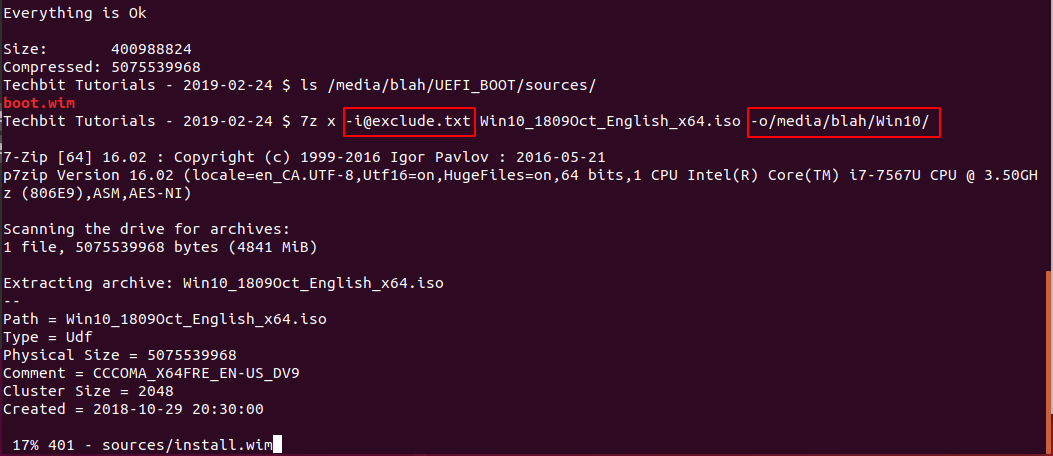
-
When finished you can list the contents of each partition
$ ls /media/blah/UEFI_Boot/
$ ls /media/blah/UEFI_Boot/sources/
$ ls /media/blah/Win10/
$ ls /media/blah/Win10/sources/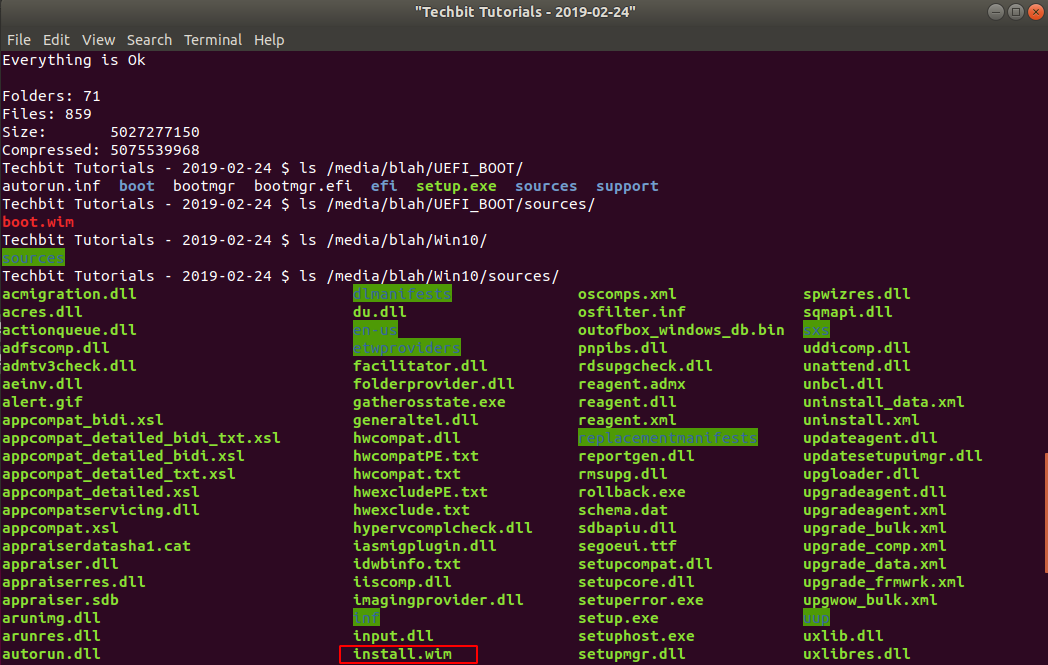
-
Click the “eject” symbol next to one of the partitions in the file explorer to safely remove the drive. Since this is USB, it might take a few minutes to eject with the message that data is still being written to the device. Wait for it to say you can safely remove and then pull out the USB
-
You should now be able to boot from this USB to install Windows 10!
If you have any questions/comments please leave them below.
Thanks so much for reading ^‿^
Claire
If this tutorial helped you out please consider buying me a pizza slice!
Frequently Asked Questions
Q. Why so complex?
Q. Why did you make it so complex with the command line and 7-zip when you could have just mounted the ISO file and copied/pasted the files through the file manager?
A. Mounting the ISO and copying/pasting the files using the file manager will absolutely work! But… I’ve found that when trying to come up with a repeatable method that can also appeal to people without as much experience as others, trying to describe in words to “copy these files but not that file and then paste this here and that there” etc. ends up with a lot of ambiguity that causes problems.
Whereas even if this method is “more complex”, and even if someone doesn’t really understand what is happening (even though I try to explain every step as I go), they’re still able to run the same commands and [usually] end up with the end result of a bootable Windows USB drive. Plus people may learn some things they didn’t know along the way : )
There are usually multiple ways of solving a problem, and if something besides what I laid out here works for you that’s great!
Q. Why so detailed?
Q. Why do you break everything down into every individual step? I already know how to do things like create a partition?
A. When I write my tutorials, I’m highly cognizant of my target audience and what skills they may or may not already have as they’re trying to follow along. Some of my tutorials (like this one) are directed towards an audience that may not have much experience with technology at all, while also being useful for those who do. I also write “advanced tutorials” and mark them accordingly at the beginning of the post.
I’m also trying to write in a way that will allow people to successfully achieve the end result without encountering any problems that they’ll then ask me about. I absolutely don’t mind people asking me for help in the comments, and I try my best to help people fix their issues (lots of evidence of that in the comments below!), but I also want to keep it to a minimum as well.
Q. Why not use {insert program here}?
Q. Why don’t you just use a program like WoeUSB or Rufus and be done with it?
A. While programs such as those have their use, I’ve found that when they don’t work, it leaves people (especially those with less tech experience) unable to identify why it didn’t work, and therefore unable to fix their USB in order to get it to boot. This leads to unnecessary frustration, and can result in people giving up. My philosophy is that you should try and make it easier for those coming along behind you. All of us start at a basic level and move up. I feel it’s more important to explain why something works, versus using something that does everything for you.
Asking for Help
Q. I’m running into a problem and I can’t get it working. Can you help me out?
A. Please post a comment with a description of the problem and any error messages. Provide as much detail as possible. Just saying “The USB doesn’t boot” doesn’t give me any information to try and help you with.
I will respond and try to help as I can.
Q. Why did you take so long replying after I asked for help in the comments? I gave up or found something else that worked like WoeUSB.
A. I provide this content (and any help!) for free without having ads or any other intrusive monetization schemes on this site. I have a full-time career, a personal life, and ADHD. I’ll reply when I can, but sometimes that might take a few days or not at all.
Donations
Q. Why do you ask for donations?
While I believe in a “free and open web”, content creators deserve to be paid for what we do. It may not seem like there’s much work to something like this site, but each article can take anywhere from 3-96+ hours to “create”. That’s a lot of additional work to do without being paid for it.
Remember kids, support your content creators if a) you want content to continue to be made and b) you want access to that content without having to endure intrusive advertisements, tracking, and having your personal information harvested and sold.
Please see this post for more information on the time and costs involved in running this website.
Thank you so so much to everyone who has donated and supported me!!! I hope everyone (whether you’ve donated or not!) is able to find my content useful! : )
Common Problems/Troubleshooting
Black Screen/No Bootable Device
When trying to boot to the USB following completion of the guide, the system remains on a black screen, or has the message “No bootable device found…"
This is usually a result of the system trying to boot using “Legacy device mode” instead of UEFI.
-
First ensure you have a UEFI BIOS. Pretty much any computer bought within the last ten years should have this.
-
Find the user manual for your computer/motherboard. See if there’s a function key (such as F11, F12, etc.) that you can press on boot to choose the boot device. If there is, choose “UEFI USB” from the list. The name of the entry will be different depending on your motherboard manufacturer.
-
If you can’t choose a temporary boot device, use the manual to find out how to enter the UEFI setup options. In here look under the “boot” settings and “device” settings. Unfortunately I can’t be more specific because UEFI settings are different depending on manufacturer, but look for options such as “enable UEFI boot”, “allow boot from USB”, “disable legacy mode”, etc.
-
If none of that works, please try creating the USB again (or use a different USB drive)
7-zip - ERROR: E_FAIL
7-zip fails with the error “ERROR: E_FAIL”.
ERROR: E_FAIL usually means one of the following things are happening:
- You are trying to extract files to a read-only area
- You are trying to extract files to a disk that does not have sufficient free disk space
- You are trying to extract files to a file system that can’t support file sizes larger than the files you’re trying to extract
- The archive name is incorrect
Pay attention to the items in the command that will be specific to your system and change accordingly.
7z x -x@exclude.txt Win10_1809Oct_English_x64.iso -o/media/blah/UEFI_Boot/
- Win10_1809Oct_English_x64.iso
- This will be the filename of the ISO file you downloaded
- /media/blah/UEFI_Boot/
- This is the path to your USB partition. It will need to be replaced with the correct path to the USB partition. This might be as simple as replacing “blah” with the username on your system, or the entire path may have to change. Please follow the instructions in the tutorial carefully.
Case Sensitivity
Something doesn’t work even though I replaced the commands with path specific to my system.
Please ensure that you are using the correct letter case. On Linux, character case matters so /media/blah/UEFI_Boot/ and /media/blah/uefi_boot/ are treated as two different things.
Permission Denied
7-zip fails with a “Permission denied” error.
This usually happens if you are trying to extract the files to a location that your user account does not have permission to access/modify. By default, Your user account should have permission to write files to your USB drive. If you encounter this error, check the the output path in the 7-zip command and ensure it’s specific to your system. Using “/media/blah/UEFI_Boot/” as displayed in the example WILL fail (unless your username is also “blah” or you manually mounted your USB device to that location).
Please follow all instructions carefully.
Media Driver Missing
The USB is created successfully, but when I boot to the Windows installer I get a message saying “A media driver for your computer is missing”.
This usually occurs in one of the following situations:
-
You have the USB drive plugged into a USB 3.0/3.1 port and your UEFI BIOS needs a special driver in order to use that port.
- If this is the case, please either try a different USB port, or manually copy the driver file for your USB ports to the USB drive and select it using the Windows installer
-
You have the USB drive plugged into a USB Hub
- While USB hubs can be great for providing additional USB ports, they can cause all kinds of weird and wonderful behaviour. Please try plugging the USB drive into a USB port directly on the computer.
USB Drive is Empty
The USB drive is empty after following the instruction.
There should be files visible on the USB drive after following the instructions. If there isn’t, please ensure you followed the instructions exactly. This includes having the correct file paths, using the correct letter case, etc.
USB Won’t Eject
The USB won’t eject from the system or is taking a really long time to eject.
-
First ensure you don’t have any windows open to the USB drive which will cause it to remain “in use”.
-
Try issuing the “sync” command and waiting for it to finish.
Other
I’m experiencing a weird problem that isn’t listed here or in the comments below.
-
Check to see if you have the USB drive plugged in to a USB hub. If so, plug the USB drive into a USB port directly on the computer and try again.
-
Try a different USB drive.
-
Ensure you read and follow all instructions carefully.
Version History:
- February 24, 2019 - Original post
- July 29, 2021 - Updated to make it more clear where to extract the files to based on where the partitions are mounted
- October 23, 2021 - Added “Frequently Asked Questions and Common Issues/Troubleshooting” sections
If this tutorial helped you out please consider buying me a pizza slice!