
Cloning Disks and Resizing LVM Partitions
This is an advanced tutorial.
It is expected that you already have quite a bit of experience with Linux, the command line, scripting, etc.
Table of Contents
Given the current ridiculous prices on all things computer, I’ve been shifting some things around internally to make better use of certain components, namely SSD storage. Because storage had gotten incredibly cheap over the years, I’m very fortunate to have an abundance of 1 TB SSDs and multiple high-density spinning drives.
Now that you’d need to take out a bank loan to build a desktop, if you’re able to even find components to buy thanks to shitty AI companies buying up everything, I figure it makes some sense to look at how I’m using the components I have.
One of my Proxmox systems is installed on a 500 GB SSD drive, and I’d like to move it to a 1 TB SSD drive instead so I can re-use the 500 GB drive in something else that doesn’t need as much space.
While this is specifically using a Proxmox install as an example, the same process can be used to clone to a larger drive, expand existing partitions, expand existing logical volumes (if LVM is being used), and expand existing filesystems.
Tools and Utilities Used
For this process I used the following tools and utilities
- 2.5" SATA to USB 3.0 adapter
- Ubuntu 24.04 desktop live USB
- dd
- parted
- pvresize
- lvextend
- resize2fs
WARNING
Make sure you have backups of your data and/or backups of your VMs and Containers (virtual disks, config files, etc.) if you care about such things. We’re going to be working directly with drive partitions, and it’s very easy to get something mixed up and wipe out all your data.
You have been warned!
Cloning the drive
Since I’m going from a smaller drive to a larger one, I’m going to use the ‘dd’ utility to clone the drive over to the larger one. Once that’s finished, I can expand the partition to fill the rest of the drive to use the rest of the space.
I only have one SATA port in this system, so I’m going to need to use the 2.5" SATA to USB 3.0 adapter to connect the second drive.
SSD’s tend to have faster read speeds than writes though, especially over USB, so how we connect this up is going to make a big speed difference.
- Original Drive: 500 GB hereby known as ogDrive
- New Drive: 1 TB hereby known as newDrive
Sooo Slow
Connections
- Internal SATA: ogDrive (500 GB)
- USB SATA adapter: newDrive (1 TB)
If we leave the ogDrive in the computer and connect the newDrive to the USB SATA adapter, we’re going to be reading quickly from the source drive, but writing much slower over the USB bus. Because dd is a byte copy utility, for the ogDrive it will copy the entire 500 GB to the newDrive whether it’s in use or not.
That’s a lot of data to move over a slower bus and it will add literal hours to the copying time as it tries to move the data through the USB bottleneck.
Much faster
Connections
- Internal SATA: newDrive (1 TB)
- USB SATA Adapter: ogDrive (50 GB)
If we reverse it and install the newDrive in the system on the SATA port, we’ll be reading data from the ogDrive over the USB bus and then writing it to the newDrive over the internal SATA bus. We’ll still be reading and writing the same 500 GB amount of data and the bottleneck will still be on the USB side, but the “pipe” will be larger so the copy will be much quicker.
Not only does this option make sense to me from a speed perspective, but from a practical standpoint we’re going to need to install the NewDrive into our system anyway to use it, so IMO it’s just as well to install the drive in the system now on the SATA port and be done with it.
You can get a much faster drive copy if you have a system with two SATA ports so the newDrive can be connected to the SATA bus as well. As I said though I only have the one SATA connector in this system as it’s a smaller mini-unit. I could have taken both drives out and put in one of my other comuters, but I didn’t want to bother with doing that at the time.
Put Your Lab Coat on
With the newDrive unplugged, we’re going to boot up into a Live USB distro so we can access the drives and perform our necessary work. I usually use a Ubuntu 24.04 ISO on a USB stick for this.
I don’t have any screenshots of the following process cause it was a Live USB, so you’ll just have to bear with me here. If I get a chance in the future (and I remember) I’ll toss a VM up to grab some screenshots.
Assuming you’ve already taken the ogDrive out and put the newDrive in to the system, leave the ogDrive unplugged for now so you can easily identify which drive is your ogDrive that you want to clone. Assuming a single drive system like this, It should be dev/sdc, but if you have the ogDrive plugged in when you boot Ubuntu Live it may be different. And as always, it could just be different on your system.
If you issue the ‘lsblk’ command, you should see something like this (not accurate):
ubuntu24.04:~# lsblk
NAME         MAJ:MIN RM   SIZE RO TYPE MOUNTPOINTS
sda            8:0    0 931.5G  0 disk
└─sda1         8:3    0   931G  0 part
sdb            8:96   1 115.2G  0 disk
├─sdb1         8:97   1 115.2G  0 part
└─sdb2         8:98   1    32M  0 part
The output above from lsblk shows that we have two drives currently recognised. The first drive, /dev/sda, is a 1 TB drive with 1 partition (sda1).
The second drive listed here, /dev/sdb, is a 128 GB drive and it has 2 partition (sdb1-2). This drive is actually the USB drive that we booted Ubuntu Live off of.
IMPORTANT
Again, the example output from lsblk above is example output only and is in no way reflective of the drive layout on your system. DO NOT use it as the basis for your commands on your system or you will very likely lose data.
If we plug the ogDrive (in the USB SATA adapter) in and run lsblk again, we see it show up in the list as /dev/sdc.
ubuntu24.04:~# lsblk
NAME         MAJ:MIN RM   SIZE RO TYPE MOUNTPOINTS
sda            8:0    0 931.5G  0 disk
└─sda1         8:3    0   931G  0 part
sdb            8:96   1 115.2G  0 disk
├─sdb1         8:97   1 115.2G  0 part
└─sdb2         8:98   1    32M  0 part
sdc            8:0    0   465G  0 disk
├─sdc1         8:1    0  1007K  0 part
├─sdc2         8:2    0   512M  0 part /boot/efi
└─sdc3         8:3    0   465G  0 part
  ├─pve-swap 252:0    0     8G  0 lvm
  ├─pve-root 252:1    0    96G  0 lvm
  └─pve-data 252:2    0   361G  0 lvm
/dev/sdc shows up as a 1 TB drive that has three partitions (sdc1-3), with the third partition having three LVM logical volumes; pve-swap, pve-root, and pve-data.
To clone our ogDrive (/dev/sdc) to our newDrive (/dev/sda), we’re going to use the dd utility.
Let’s Clone!
IMPORTANT!!!
POTENTIAL DATA LOSS AHEAD
Look you’re probably tired of me saying to be careful, but the next step WILL result in data loss if you do not have the correct drive locations specified.
Make absolutely sure you’ve identified the correct devices before continuing.
The dd utilty takes an “input file” and copies the file, byte by byte, to an “output file”.
The input file will be the location we’re copying from, so /dev/sdc, and the output file will be location we’re copy to; /dev/sda.
ubuntu24.04:~# dd if=/dev/sdc of=/dev/sda status=progressThe ‘status=progress’ part of the command is really helpful to see how much data dd has already copied. Without it you won’t see any output on the screen and will just have to wait. And wait. And wait. Without any idea of how much longer it might take.
After dd has finished you can unplug the USB cable for the ogDrive as we won’t need it anymore.
If you issue the ‘lsblk’ command again, You should now see that /dev/sda has 3 partitions listed that match the ogDrive.
- Note: You may or may not see the LVM labels on the new drive at this time. It’s ok if you don’t.
ubuntu24.04:~# lsblk
NAME         MAJ:MIN RM   SIZE RO TYPE MOUNTPOINTS
sda            8:0    0   465G  0 disk
├─sda1         8:1    0  1007K  0 part
├─sda2         8:2    0   512M  0 part /boot/efi
└─sda3         8:3    0   465G  0 part
  ├─pve-swap 252:0    0     8G  0 lvm
  ├─pve-root 252:1    0    96G  0 lvm
  └─pve-data 252:2    0   361G  0 lvm
sdb            8:96   1 115.2G  0 disk
├─sdb1         8:97   1 115.2G  0 part
└─sdb2         8:98   1    32M  0 part
Resize the /dev/sda3 Partition
Since we’re still in Ubuntu Live, the easiest way to handle the next part is to use the program “parted” to resize the /dev/sda3 partition so that we can use the full size of it.
- Open the application “parted”
- Make sure the /dev/sda device is selected
- Right-click on the 3rd partition block (this corresponds to /dev/sda3)
- Choose “Resize”
- Click on the right hand side handle of the existing block and drag it all the way to the right to “expand” the partition
- If you’re happy with your changes, click Apply
You can now shut down the system and remove the USB stick you booted Ubuntu from.
Booting Proxmox
Since you already have the NewDrive installed in the system, you should be able to power the system back on and it should boot up into Proxmox.
From there you can SSH to the system and we can expand the pve-data volume.
Confirming the Existing Disk Layout
-
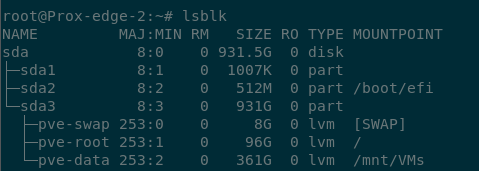
Issue the lsblk command and you’ll see the same disk layout from the ogDrive
ubuntu24.04:~# lsblkWe can see that /dev/sda3 is 931 GB in size, but the pve-data logical volume is still only 361 GB. That’s because we told the partition that we wanted it to be larger, but we haven’t told the volume yet.
-
If we have a look at the volume groups we can see that we only have 1 volume group created called “pve”.
ubuntu24.04:~# vgsWhen we look at the details of that volume group it shows that it’s 465 GB in size (Alloc) with basically no free space.
ubuntu24.04:~# vgdisplay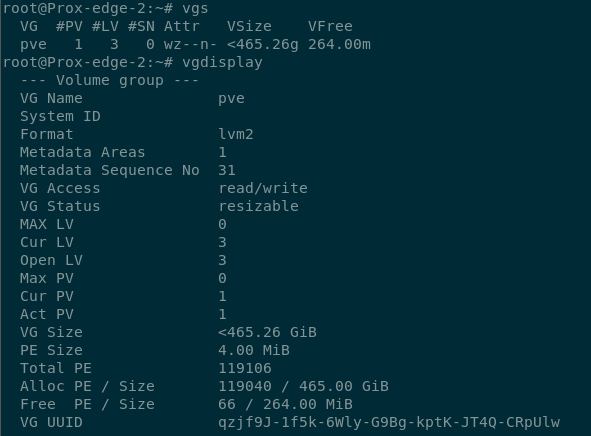
-
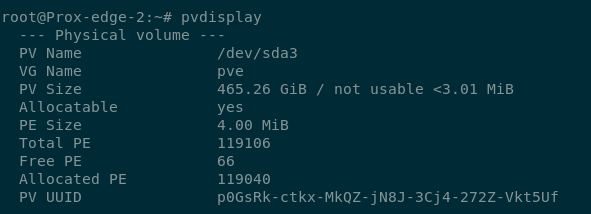
Let’s have a look at the physical details and see if that looks more promising.
ubuntu24.04:~# pvdisplayThat shows us the volume for /dev/sda3 is 465 GB in size, but we know from lsblk that /dev/sda3 is 931 GB in size, so what’s going on?
Essentially, even though we expanded the size of the partition on the disk, the LVM volume group was created on a physical volume that was 465 GB in size. So as far as the LVM is concerned, the physical volume is still only 465 GB in size because it doesn’t know the partition has changed on disk.
Updating LVM Volumes
Updating the LVM Disk Layout
-
Even though the LVM physical volume doesn’t know there’s additional space to be had, we can inform it to look for new changes on disk.
ubuntu24.04:~# pvresize /dev/sda3Now when we look at the details of the physical volume again, we see that it’s 931 GB in size.
ubuntu24.04:~# pvdisplay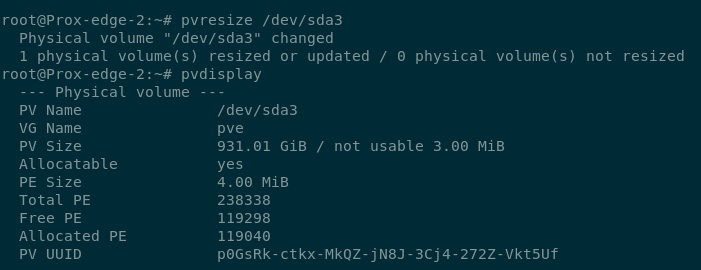
-
Looking at the details of the volume group again, now we can see that while it’s still 465 GB in the “Alloc PE size”, there’s also now an additional 466 GB showing in the “Free Size” section.
ubuntu24.04:~# vgdisplay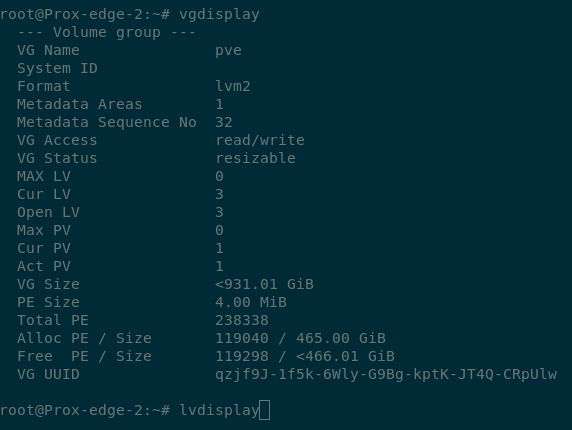
-
The logical volume path is /dev/pve/data and has a size of 361 GB.
ubuntu24.04:~# lvdisplay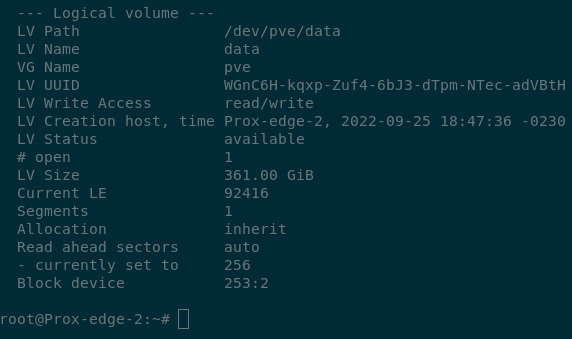
Resizing the Logical Volume
-
Now that we have the physical volume recognizing the new partition layout, we can extend the logical volume to fit the new space
ubuntu24.04:~# lvextend -l +100%FREE /dev/pve/data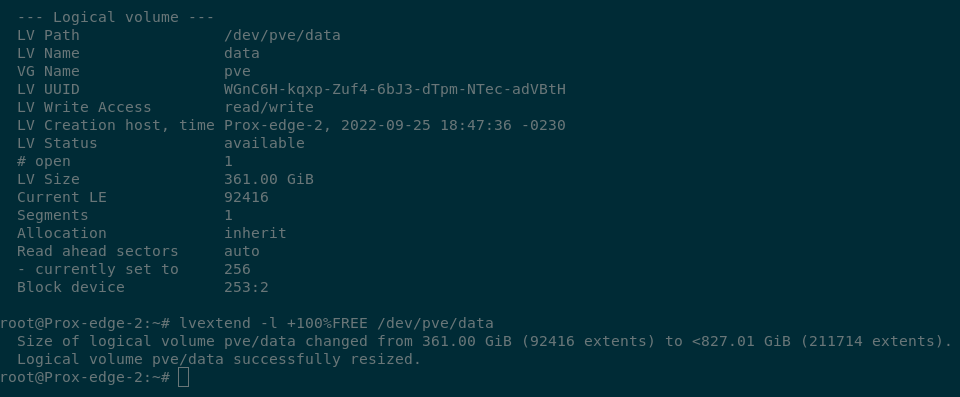
-
And once again now when we look at the volume group we see that our Alloc size is 931 GB and our free space is 0.
ubuntu24.04:~# vgdisplay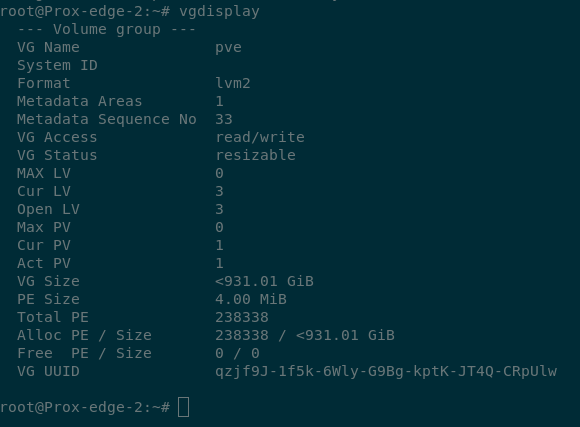
-
Yay! We did it! “pve-data” should be much larger now… what?
ubuntu24.04:~# df -hOK… it’s still only showing as 355 GB.. Maybe we should reboot
ubuntu24.04:~# reboot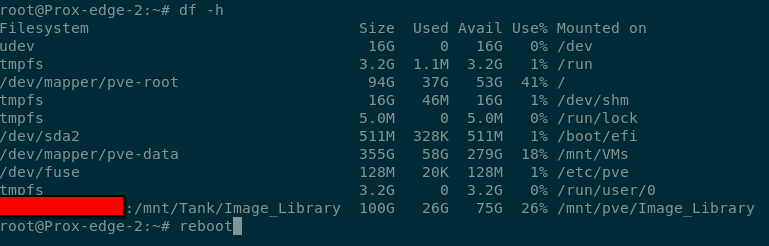
-
OK, reboot done. Uhh…
ubuntu24.04:~# df -hOK what’s happening here? Why are we not seeing the resized space?
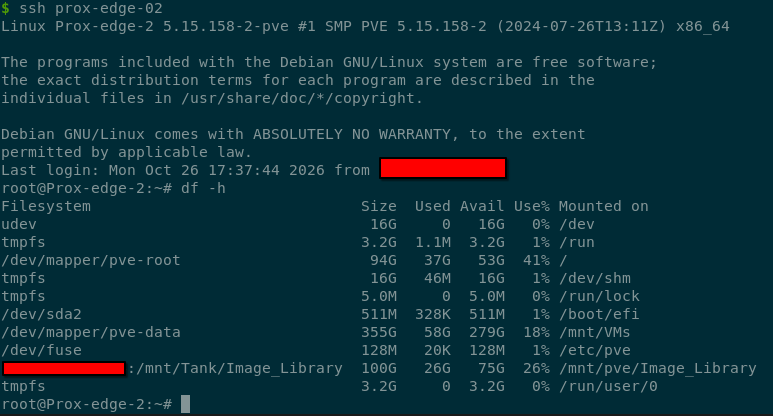
Resizing the Filesystem
-
While the logical volume was resized, the filesystem inside the logical volume was not. If we have a look at the filesystems we see that pve-data still has 278.8 GB of free space (this is not the total size) and is formatted as ext4.
ubuntu24.04:~# lsblk -f
-
Let’s run df-h again to get the filesystem location for pve-data.
ubuntu24.04:~# df -hdf -h is reporting that it’s /dev/mapper/pve-data. Now we can use that to resize the filesystem. The filesystem is ext4, so we can use the resize2fs utility to grow the existing filesystem into the available space.
ubuntu24.04:~# resize2fs /dev/mapper/pve-data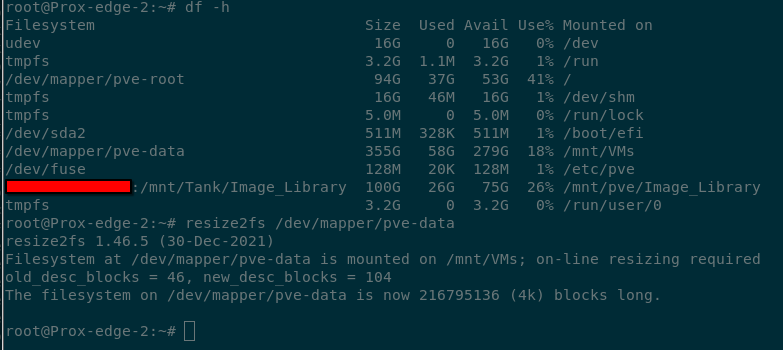
-
Now we can verify this after the change, no reboot required. lsblk reports /dev/sda3/pve-data is now 827 GB in size
ubuntu24.04:~# lsblk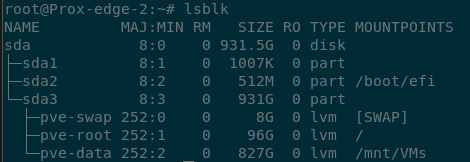
while lsblk -f reports that there is 718.9 GB of free space in the /dev/sda3/pve-data filesystem
ubuntu24.04:~# lsblk -f
-
df is now showing /dev/mapper/pve-data as 813 GB in size
ubuntu24.04:~# df -h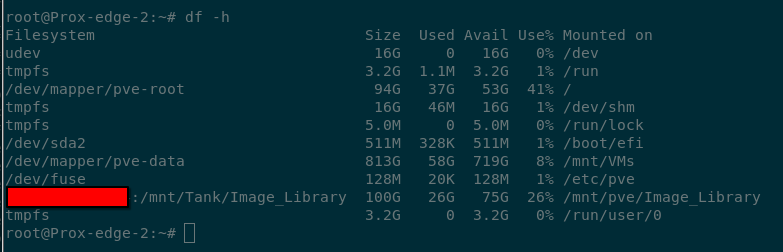
And that’s it. The pve-data LVM volume is now using 100% of the additional free space on the drive, and Proxmox is configured exactly the same as it was on the ogDrive because we made a direct clone to a larger drive.
One last thing I should note here. You may have noticed some discrepancies among the reported space usages/totals above etc. That’s because of a few different factors such as some utilities reporting space in Gigabytes (GB) while others are reporting in Gibibytes (GiB). Formatting/filesystems can also have an impact on the reported total size available (ie 931 GB) versus the size advertised on that package (1 TB). In fact, even though the 931 GB is reported as GB for “Gigabytes” it’s actually GiB (Gibibytes) as 1 Terabyte = 931.3226 Gibibytes (GiB). Thanks folks for making things confusing…
If you have any questions/comments please leave them below.
Thanks so much for reading ^‿^
Claire
If this tutorial helped you out please consider buying me a pizza slice!